Introduction
An image that appears as too bright is classed as overexposed and an image that appears too dark is classed as underexposed. In digital photography, 3 factors control how bright or how dark an image is – Shutter speed, aperture and ISO
Shutter Speed
- Shutter speed refers to the amount of time the image sensor is left open for. The longer it is left open the brighter the image will be, and vice versa.
- Generally, DSLR cameras will have shutter speeds from 1/4000 (a 4000th) of a second to around 30 seconds.
- If you wish to capture droplets of water or use your camera for sports, fast shutter speeds (or short exposures) will allow you to do this. Use slow shutter speeds to create movement. See 2 examples below, on the left I used a slow shutter speed to create the sense of movement. For the right shot of a butterfly, as the subject was flying around frantically, as soon as it landed I needed a fast shutter speed to keep the image sharp.


- The bulb function on a camera allows you to keep the shutter speed open for as long as the shutter button is held down for. You would use this when you need to take a shot for longer than 30 seconds. You can purchase shutter release cords for most DSLRs which will allow you to lock the shutter open until you unlock it, which will save you having to keep your finger on the shutter button. As keeping your finger on the shutter, even on a sturdy tripod will most likely cause unwanted blur.
Aperture
- Think of aperture like a window – If a room contains a large window and another room of the same size contains a smaller window, the room with the larger window will allow more light to pass through thus producing a brighter view
- So aperture is effectively the size of the hole that allows light to pass through the lens to the image sensor (or film)
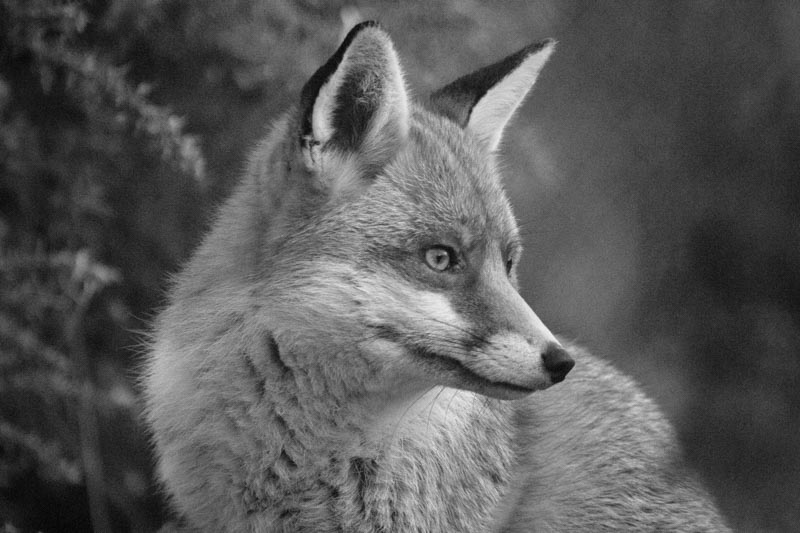
- Aperture not only helps to manage the amount of light that enters the cameras sensor, but it also controls how much of the image is in focus. With the 2 examples below, I have used a large aperture (F2.8) to blur the background on the image of the conifer cone. This is also known as Bokeh. Using a small aperture (eg F16), would allow for front to back focus, good for maybe landscape photography like the image below left.


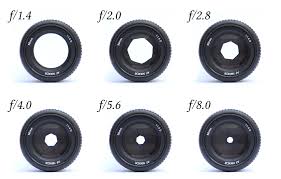
- Aperture is measured in F-stops. This is where the confusions begins – F-stops are written as fractions so the smaller the F-stop the more amount of light that will be allowed to pass through.
- Full F-stops largest (meaning more light) to the smallest (less light) – F1, F1.4, F2, F2.8, F4, F5.6, F8, F11, F16, F22, F32
- See the diagram below which may aid further with the above description.
ISO
- ISO refers to the sensitivity of the sensor. The more sensitive the sensor is set to, the brighter the image will be. Increasing ISO will amplify the light that is captured by the sensor to effectively produce a brighter image.
- Increasing the ISO is fantastic for low light conditions but comes at a price. Because increasing the ISO amplifies the information that is captured by the sensor, the resulting image will be full of noise or speckled pixels. So increase slowly, and always set the ISO back to a low setting when you do not need to amplify the captured light. This will result in better image quality. Such as 100-400.
- I try not to go any higher then ISO800 (see below for full ISO numbers). But even at ISO800, for some cameras this can result in poor quality images.
- Full ISO – 100, 200, 400, 800, 1600, 3200, 6400
Combining shutter speed, aperture and ISO
- For most exposures or shots, you should use the cameras built-in exposure meter to help calculate the correct full exposure. But say if the camera meters an exposure with shutter speed of 1/20 at an aperture of F11. This would result in a blurred shot unless the camera was placed on a tripod. But by increasing the aperture by 1 stop (so using a lower F stop, remember fractions), making it F8 (see full F stops above). You can then take the exposure with a shutter speed of 1/40. Double the previous time.
- So increasing the aperture by 1 F stop, will allow you to take a shot with a shutter speed twice as quick and vice-versa.
- If you are already using the largest F stop your lens can handle. But the built-in meter on the camera is showing a shutter speed of 1/20. Again this is too slow in most situations. By increasing the ISO, say from ISO200 to ISO400, you can then use a shutter speed of 1/40.
- My advice would be to always use either
- ‘Shutter Priority‘ (Tv on the dial) – Select this when you want to have full control of the shutter speed setting, but allow the camera to calculate the aperture for the correct exposure. Use the primarily if you need a fast shutter speed (such as sports), or a slow shutter (such as creating motion blur, or light streaks from moving cars at night)
- ‘Aperture Priority‘ (Av on the dial) – This is generally what my camera is set to. This allows me to control the field of focus if I want a blurred background or not for example. With this setting you have full control of the aperture and the camera will calculate the correct shutter speed for you.
- Exposure compensation – Modern cameras are pretty good at calculating the correct exposure or image brightness by examining parts of the framed shot. However it doesn’t always work, and you have to sometimes make fine adjustments. An example of when it will fail is when you have a lot of white or black areas in your framed shot. Such as a lot of shadows or a lot of white sky. With a lot of white sky, the camera will think the image is too bright and therefore make the exposed image darker then you would want it to be. With a lot of blacks, the results are the opposite. So as a guide, if you do have a lot of white you may wish to tell the camera to add +1 or +2 compensation to the exposure. With Av or Tv selected, exposure compensation is usually managed using a wheel on the back of the camera, or sometimes by pressing a button with a +/- written on it.